Titanium alloy and aluminum alloy are similar in the following aspects: both metals are used to manufacture aircraft structural parts, in which case 90% of the materials may need to be ground off before the parts are completed. Many stores may want these metals to have more in common.
Aircraft manufacturers, who are good at machining aluminum, find that they process much more titanium because newer aircraft designs use more titanium.
As far as we are concerned, we will say that titanium is not necessarily difficult, but the whole processing process must be considered, because any one factor may hinder the effectiveness of the whole process.
Stability is the key. When the tool contacts the workpiece, it closes a circle. The tool, carriage, spindle, column, guide rail, table, fixture and workpiece are all part of the circle and part of the required stability. Other important considerations include the pressure and volume of the coolant, as well as the method of delivering the coolant. This paper focuses on methods and applications. In order to give full play to the potential of these processes and make them have the potential to process titanium productively, the following suggestions are useful:
1. Keep Radial Engagement Low
One of the key challenges for titanium is cooling. In this kind of metal, the heat generated in the process of processing is relatively less discharged with the chip. Compared with other metals, a larger proportion of heat enters the tool during titanium processing. Because of this influence, the choice of radial meshing determines the choice of metal surface velocity.
The chart in Figure 1 shows this. Full notching (i.e., 180 degree engagement) requires a relatively low surface speed. But reducing the radial engagement reduces the time that the cutting edge generates heat and allows the cutting edge more time to cool before the next rotation enters the material. Therefore, due to the reduction of radial engagement, the surface velocity can be increased while maintaining the temperature at the cutting point. For finishing, a milling process consists of a very small contact arc with a sharp, honed cutting edge and a high surface speed and minimum feed per tooth to achieve extraordinary results.
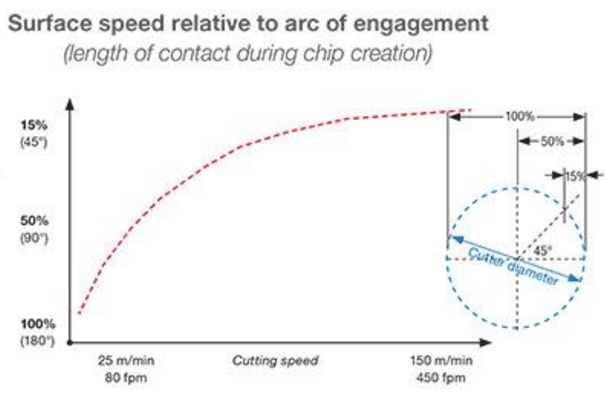
Fig1. keep radial engagement low
2. Increase Flute Quantity
Commonly used end mills have four or six grooves. In titanium, this may be too little. A more efficient number of flutes can be 10 or more (see Figure 2).
Increasing the number of flutes makes up for the low feed per tooth. In many applications, the groove spacing of the ten hole tool is too tight for the chip gap. However, the productive milling of titanium has tended to have a lower radial depth (see tip 1). The resulting microchip is open to the free use of high-throughput counting end mills to improve productivity.
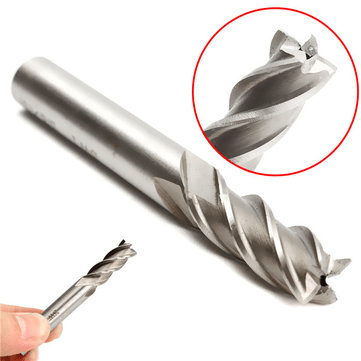
Fig2. Increase flutes quantity
3. Make a Thick-to-Thin Chip
Climbing milling is a familiar term for this concept. In other words, do not feed the milling cutter, so that the blade will pass through the material in the direction of the cutter feed. Known as traditional milling, this process makes chips thinner and thicker. When the tool strikes the material, the friction creates heat before the material begins to shear from the base metal. Instead of absorbing and exhausting the heat generated, the sheet enters the tool. Then, at the exit point, the chip is thick, increasing the cutting pressure to make the chip stick.
Climb milling—or thick-to-thin chip formation—starts with the cutting edge entering the excess material and exiting on the finished surface (see Figure 3). On side milling, the tool tries to “climb over” the material, creating a thick chip on entry for maximum heat absorption and a thin chip on exit to prevent chip adhesion.

Fig3. make a thick-to-thin chip
Profile milling requires careful examination of the tool path to ensure that the tool continues to enter the excess material in this way and exit the machined surface in this way. It’s not always as easy to do this in a complex pass as just keeping the material right.
4. Arc In
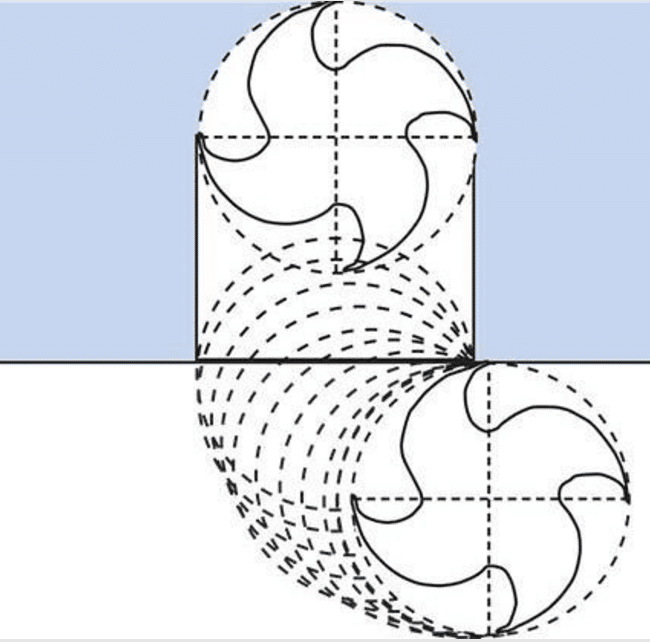
In titanium and other metals, tool life is lost in the dramatic changes in force. These worst moments usually occur when tools enter the material. Feeding the tool directly (which almost all standard tool paths do) produces an effect similar to hitting the cutting edge with a hammer. And slide the tool in gently. To do this, create a tool path so that the tool arc enters the material, not in a straight line (see Figure 4). The arc entry path allows the cutting force to increase gradually to prevent gripping or tool instability. The generation of heat and chips also increases gradually until the tool is fully involved in cutting.
Fig.4 arc-in
5. End on a Chamfer
The impact force also changes at the tool exit. As useful as thick to thin cutting (tip 3), the problem with this method is that when the tool reaches the end of the weld bead and begins to remove the metal, the thick to thin formation stops abruptly. A sudden change will produce a similar sudden change in force, impacting the tool and possibly damaging the part surface. In order to prevent such a sudden transition, preventive measures should be taken. First, a 45 degree chamfer should be milled at the end of the pass so that the cutter can see the radial cutting depth gradually decrease (see Fig. 5).
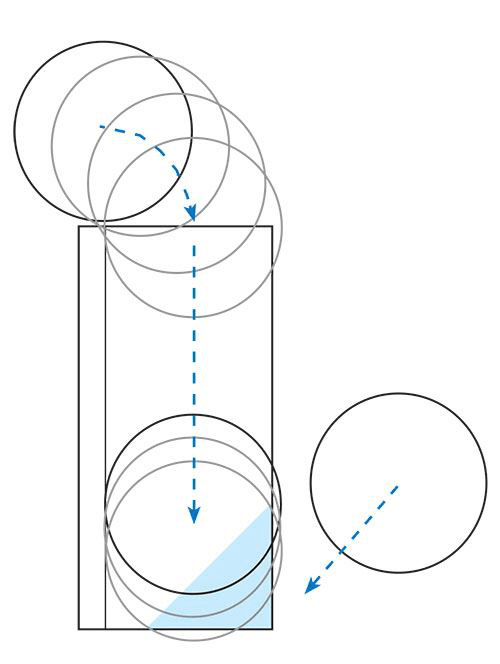
Fig.5 end on a chamfer
6. Rely on Secondary Relief
A sharp cutting edge can minimize the cutting force of titanium, but the cutting edge also needs to be strong enough to resist the cutting pressure. Secondary relief tool design, the first positive front area resistance, followed by the second area to increase the gap, to achieve these two goals (see Figure 6). Secondary rescue is a common tool, but different secondary relief designs in titanium, especially in test tools, may reveal changes in cutting performance and tool life.

Fig.6 secondary relief tool design
7. Alter the Axial Depth
At the cutting depth, oxidation and chemical reactions can affect the tool. If the tool is reused at the same depth, early damage may occur at this point. In continuous axial cutting, this damaged area of the tool may cause work hardening, as well as lines on parts unacceptable to aerospace components, which means that this effect on the surface may require tool replacement in advance. To prevent this, the maintenance tool allocates different points in the problem area along the flute (see Figure 7) by changing the axial depth reduction for each pass, and a similar result can be passed through the first cone turning and the subsequent passes in parallel to prevent the cutting depth cutting.

Fig.7 axial depth reduction changed by allocating different points in problem area
8. Limit the Axial Depth Around Slender Features
Scale 8:1 helps to remember the thin-walled and unsupported features in milling titanium. In order to avoid deformation of the bag walls, these walls are milled in a continuous axial phase instead of using a single end mill to mill the entire wall depth. Specifically, the reduction of the axial depth of each step should not be greater than 8 times the wall thickness, which will make these milling after passing (see Figure 8). If the wall thickness is 0.1 inch, for example, milling through adjacent axial depths should not exceed 0.8 inch.
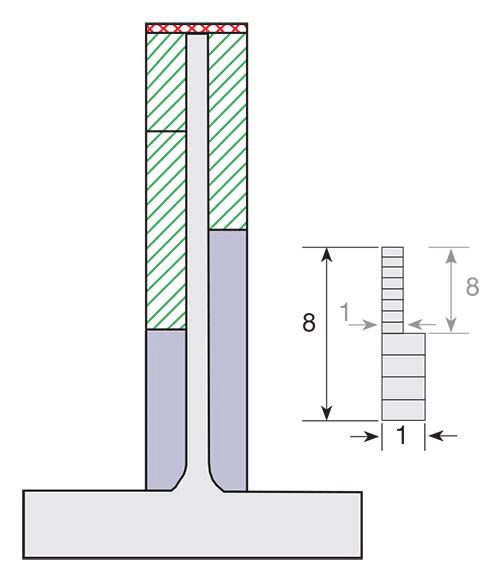
Fig.8 ratio of axial depth to thickness of the wall is less than 8:1
Despite the depth limitations, it is possible to use this rule so that productive milling is still possible. For this purpose, the thin wall is processed so that the rough raw material shell remains around the wall, making the feature 3 or 4 times thicker than the final feature. For example, the 8-1 rule allows an axial depth of 2.4 inches if the wall is kept 0.3 inches thick. Through these channels, the thick wall is machined to the final dimension with a lighter axial depth.
9. Choose a Tool Much Smaller than the Pocket
Due to the extent to which the tool absorbs heat in titanium, the tool requires clearance to allow cooling. When milling small grooves, the diameter of the tool should not exceed 70% of the groove diameter (or similar size) (see Figure 9). If the gap is less than this value, it is possible to insulate the tool from the coolant and trap debris that may take some of the heat away.
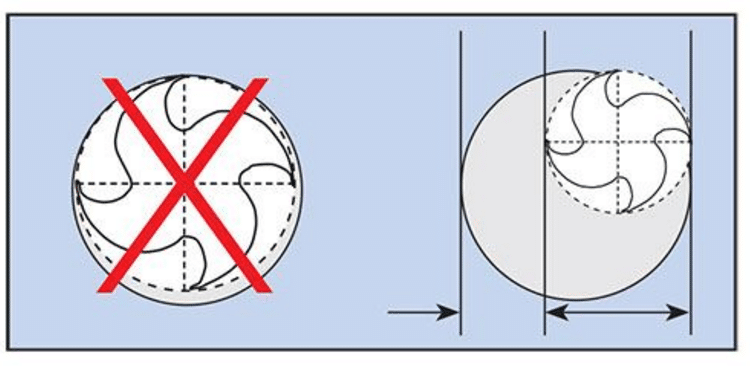
The 70% rule can also be applied to milling tools at the top of the surface. In this case, the width of the feature should be 70% of the tool diameter. The tool is offset by 10% to encourage the creation of thick and thin chips.
Fig9. choose a tool much smaller than the pocket
10. Take a Cue from Tool Steel
The high feed milling cutter is a tool concept developed for machining tool steel in the mold industry in recent years. It has been used to process titanium in recent years. The high feed mill requires a light axial cutting depth, but when operating at this light depth, the cutter allows a higher feed rate than the conventional design of the milling cutter.

The reason is that the chips become thinner. The key to a high feed mill is a blade with a large radius curve to its cutting edge (see Figure 10). This radius extends chip formation to a large contact area at the edge. Due to thinning, an axial cutting depth of 0.040 inch may produce a chip thickness of only about 0.008 inch. In titanium alloy, this kind of sheet overcomes the disadvantage of low feed per tooth which is usually required by this metal. The thinning of the chip opens the way for higher programming feed speed.
Fig10. the steel of tool will tell

